JWT Authentication in Node.js Explained Simply

Authentication is one of the most important concepts in backend development.
Whenever users log into an application, the server needs a secure way to identify them in future requests.
Modern applications commonly use JWT (JSON Web Token) for this purpose because it is simple, scalable, and works very well with APIs.
In this article, we’ll understand what authentication means, what JWT is, how JWT authentication works in Node.js, and how protected routes use tokens for authorization.
What Authentication Means
Authentication is the process of verifying a user’s identity.
Example:
User enters:
Email
Password
The server checks whether the credentials are correct.
If valid:
User is authenticated
After authentication, the server must remember who the user is for future requests.
Why Authentication is Needed
Imagine a social media application.
Without authentication:
anyone could access private accounts
anyone could update user profiles
anyone could delete posts
Authentication ensures that only verified users can access protected resources.
Traditional Authentication Problem
HTTP is stateless by default.
This means every request is treated independently.
Example:
GET /profile
The server does not automatically know who sent the request.
JWT solves this problem using token-based authentication.
What is JWT?
JWT stands for:
JSON Web Token
A JWT is a secure token used to identify authenticated users.
After login:
Server creates a token
Token is sent to the client
Client stores the token
Client sends token with future requests
Server verifies the token
JWT Authentication Flow
  User Login
      ↓
  Server Verifies Credentials
      ↓
  JWT Token Generated
      ↓
  Token Sent to Client
      ↓
  Client Stores Token
      ↓
  Client Sends Token in Requests
      ↓
  Server Verifies Token
      ↓
  Protected Data Returned
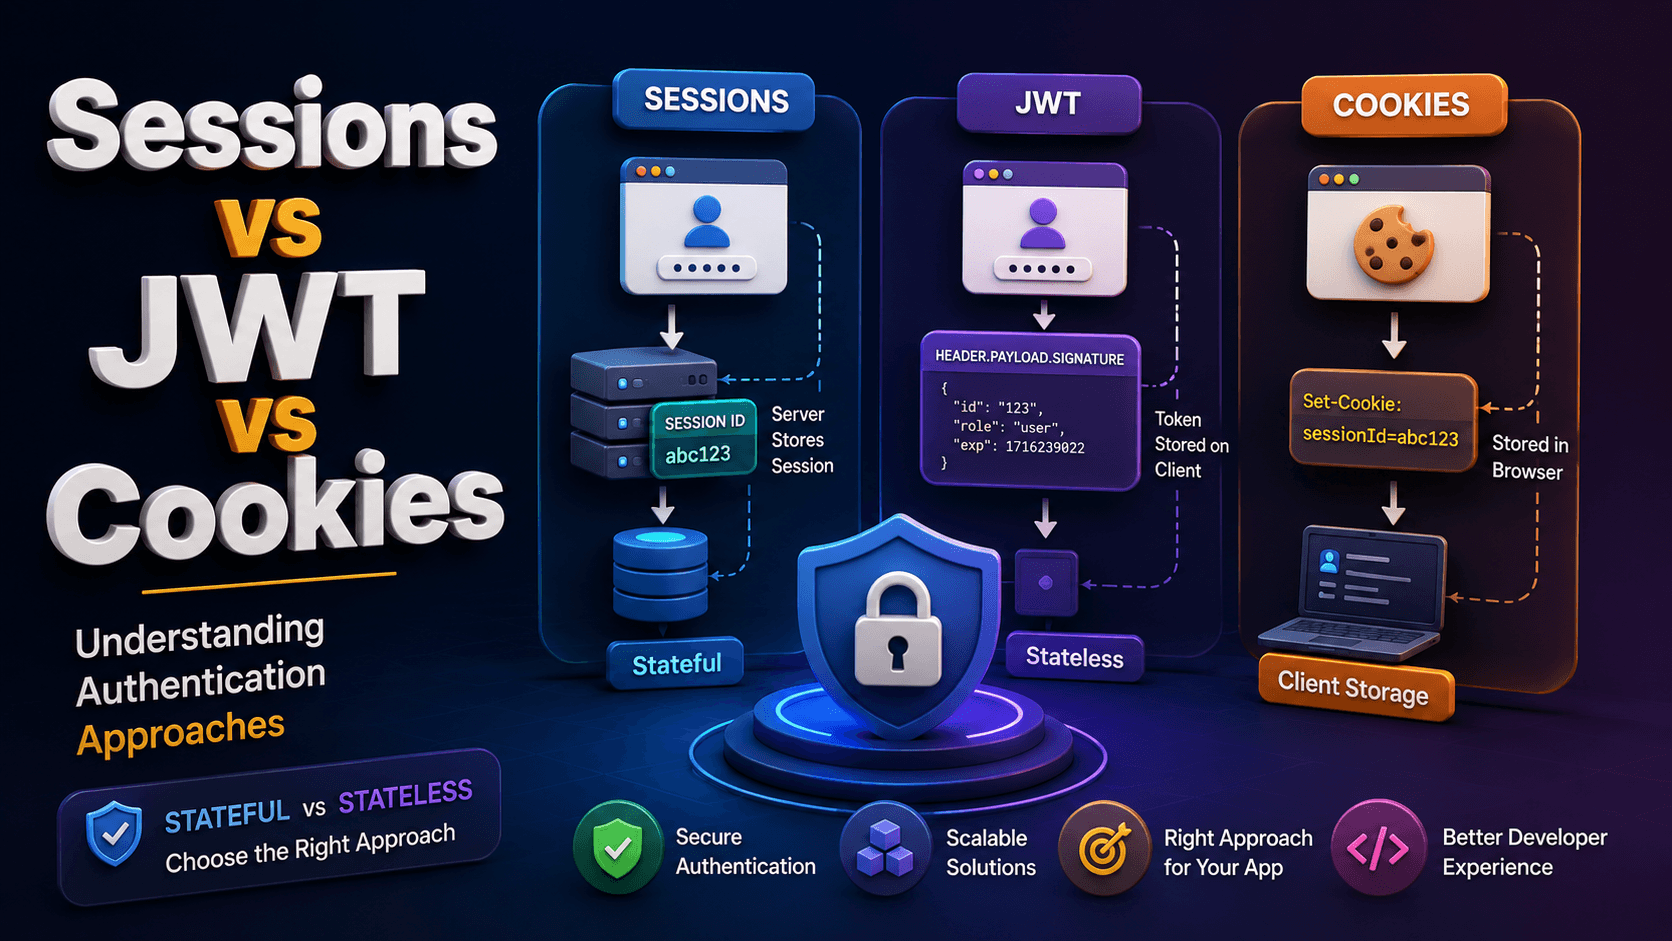
JWT is Stateless Authentication
JWT authentication is called stateless because the server usually does not store login session data.
Instead:
Token itself contains user information
This makes JWT systems scalable and API-friendly.
Structure of a JWT
A JWT contains three parts:
HEADER.PAYLOAD.SIGNATURE
Example:
eyJhbGciOi...
.
eyJpZCI6...
.
SflKxwRJS...
Each section has a specific purpose.
1. Header
The header contains metadata about the token.
Example:
{
  "alg": "HS256",
  "typ": "JWT"
}
It specifies:
token type
signing algorithm
2. Payload
The payload contains user-related data.
Example:
{
  "id": "123",
  "email": "user@example.com",
  "role": "user"
}
This information is called claims.
Important:
JWT payload is encoded, not encrypted.
Do not store:
passwords
sensitive secrets
confidential information
3. Signature
The signature verifies that the token was not modified.
The server creates it using:
header
payload
secret key
This ensures token integrity.
Login flow using JWT
Creating a JWT Token
Example:
import jwt from "jsonwebtoken";

const token = jwt.sign(
    {
        id: user._id,
        email: user.email
    },
    process.env.JWT_SECRET,
    {
        expiresIn: "7d"
    }
);
Understanding the Parameters
Payload :
{
    id: user._id,
    email: user.email
}
Data stored inside the token.
Secret Key :
process.env.JWT_SECRET
Used to sign and verify tokens.
Expiration Time :
expiresIn: "7d"
Defines how long the token remains valid.
Sending JWT to Client
After successful login:
res.json({
    token
});
The frontend stores the token.
Usually in:
localStorage
sessionStorage
HTTP-only cookies
Sending Token with Requests
The client sends the token in request headers.
Example:
Authorization: Bearer jwt_token_here
This is the standard JWT authorization format.
Protecting Routes Using JWT
Protected routes require valid tokens.
Example middleware:
import jwt from 'jsonwebtoken'

const authMiddleware = (req, res, next) => {

    const authHeader = req.headers.authorization;

    if (!authHeader) {
        return res.status(401).json({
            message: "Token missing"
        });
    }

    const token = authHeader.split(" ")[1];

    try {

        const decoded = jwt.verify(
            token,
            process.env.JWT_SECRET
        );

        req.user = decoded;

        next();

    } catch (error) {

        return res.status(401).json({
            message: "Invalid token"
        });
    }
};
Using Protected Middleware
Example route:
app.get("/profile", authMiddleware, (req, res) => {

    res.json({
        message: "Protected profile",
        user: req.user
    });

});
Only authenticated users can access this route.
JWT Token Validation Lifecycle
  Client Sends JWT
        ↓
  Server Extracts Token
        ↓
  JWT Signature Verified
        ↓
  Payload Decoded
        ↓
  Access Granted
Conclusion
JWT authentication provides a modern and scalable way to handle user authentication in Node.js applications.
By understanding:
how JWT works
token structure
login flow
protected routes
token verification
you can build secure authentication systems for modern applications.
JWT may seem complicated initially, but once you understand the token flow, it becomes one of the most practical and widely used authentication approaches in backend development.